June 2, 2011 11:06 AM
The Flex 4.5 SDK compiler is slightly faster and more conservative
about memory compared to its previous version. There are a couple of
small changes that a developer can make to speed up compilation. One
of them involves a new compiler option and others are related to
organizing code in your project and can be leveraged by customers on
the 4.0 SDK as well.
The New Compress Option (non-mobile projects only)
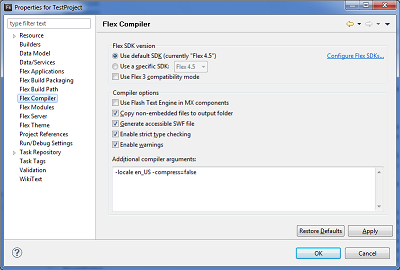
SWF files can be compressed or uncompressed. SDK 4.5 exposes a
compiler option to control whether the output SWF is compressed or
uncompressed. Try setting -compress=false in
Project properties -> Flex Compiler -> Additional Compiler arguments.

Before you go ahead and set this, note the caveats:
- Flash Builder automatically sets this option for Mobile projects (and removes it on an Export Release build).
- If you set the option, you'll have to remove the option before exporting a release build unless you are fine with 2x - 10x increase in SWF size.
- Strangely, we found Flex runtime performance implications when an uncompressed SWF was generated. This requires more investigation, but it is something that must be kept in the back of your mind and the reason why this is not the default behavior.
The numbers: 2239ms before and 1734ms after (On a large customer project when making an incremental change of width in MXML). That is roughly 22%, but your mileage will vary depending upon the actual contents of your project. Normal projects are unlikely to give this drastic an improvement in compilation speed.
Move Embedded Assets into a Library Project
This is very important especially if you use embedded fonts. This will save a lot of time and reduce your overall heap memory consumption. Here's how:
1) Create a library project in Flash Builder.
2) Create an Actionscript class in this project and put your embedded font and image declarations there:
package
{
  public class TestProjectAssets
  {
    [Embed(source="fonts/MySuperDuperFont.otf",
                    fontFamily="SuperDuperFont",
                    mimeType="application/x-font",
                    embedAsCFF="true")]
    private const SuperDuperFont:Class;

    [Embed(source="assets/mainMenu.png")]
    public static const mainMenuImg:Class;
  }

}
3) Copy over the fonts and assets into the src directory.
4) In your main project, add the library project you created as a reference in Project Properties -> Flex Build Path -> Add Project.
5) In the main MXML file of your project, declare an instance of the class you created in the library project. This is so that the class is linked in to your project and fonts and assets are available for use in your main project:
<?xml version="1.0" encoding="utf-8"?>
<s:WindowedApplication
  xmlns:fx="http://ns.adobe.com/mxml/2009"
  xmlns:s="library://ns.adobe.com/flex/spark"
  xmlns:mx="library://ns.adobe.com/flex/mx">
  <fx:Script>
    <![CDATA[
      import TestProjectAssets;

      private var projectAssets:TestProjectAssets;
    ]]>
  </fx:Script>
  <fx:Style>
    @namespace s "library://ns.adobe.com/flex/spark";
    @namespace mx "library://ns.adobe.com/flex/mx";

    global
    {
      font-family: SuperDuperFont;
      color: white;
      fontAntiAliasType: advanced;
    }
  </fx:Style>
</s:WindowedApplication>
Image instances in TestProjectAssets are static so that you can easily refer to them from any MXML file.
The numbers: 1368ms before and 1255ms after (on change of width in a test project). That is about 8.26%, but the improvement will increase proportionally with the amount of embedded assets and fonts.
Moving your CSS file to a Library Project
Okay, I'm stretching facts a bit here. This doesn't save you a lot of compilation time. But it is nevertheless a neat thing to do. The biggest advantage is that CSS files are separated out.
Here's how you do it:
- Create a library project.
- Create a CSS file named defaults.css in the src directory.
- Go to Project Properties -> Flex Library Build Path -> Assets. Expand src and check defaults.css.
- In your main project, add the library project you created as a reference in Project Properties -> Flex Build Path -> Add Project.
Now defaults.css will be automatically applied to your main project without having to add any fx:Style tags to your application MXML file.
You can combine this with the second approach mentioned above though keep in mind that embedding fonts via font-face will not work if you declare that in defaults.css. Similarly if you use the background-image style in defaults.css, you won't get as much performance boost compared to moving it an Actionscript class.
Note on the Numbers
Numbers reflect the time taken for incremental compile only. A simple MXML attribute like width is changed and numbers are recorded by repeating this five times.